Button Express Updated Tutorial
Heres your chance to share your own tutorials with the community. Just post them on here. If your lucky they may even be posted on the main site.


Quick Profile
Information
Posts: 2870
Joined: Mon Jul 27, 2009 11:58 am View Full Profile
Hi All
Here is a Tutorial for an Updated Version of my Button Express Program. Again this is a Very
Easy Program to make/Code but is very effective never the less.
Just to let you all Know that there are over 100 usable Buttons within this Program
Just like to Give a Big Thanks to CodenStuff for his Help on this Program (Cheers ;) )
Right Lets get Crackin!
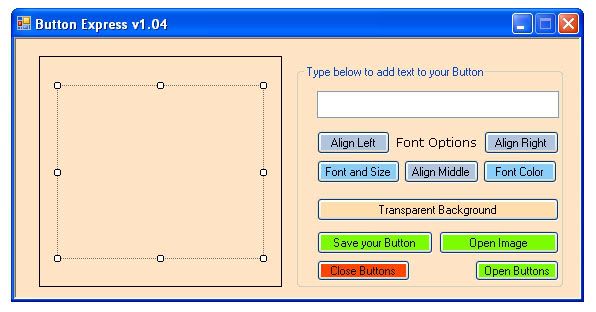
On the Form you will need
10 Buttons
8 Comboboxes ( or you can use 1 Combobox)
1 Panel
2 Labels
2 Groupboxes
1 Timer = ENABLE in the Timer Properties
1 ColorDialog
1 FontDialog
1 OpenfileDialog
1 SavefileDialog
![Image]()
![Image]()
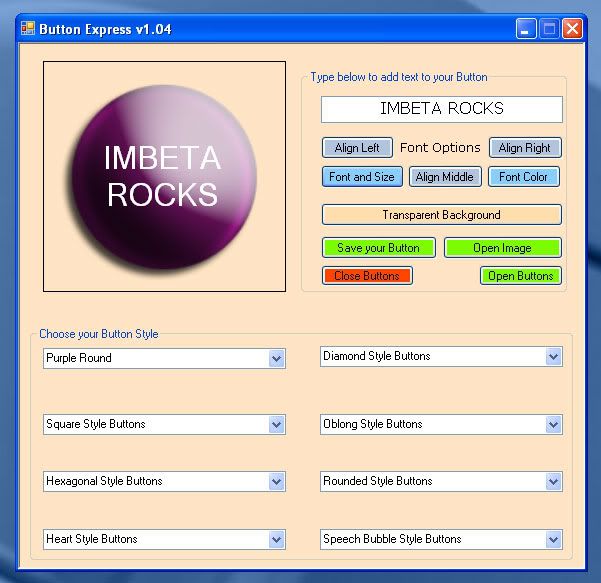
As you can see by the 2nd Screenshot Above I have used 8 Comboboxes to link
to my Images ( as i have a few).
But You can put all your Button Pictures Linking to Just 1 Combobox, But it all depends on how
many Images you want to use and how you want it to look, I did have 1 Combobox in the
beginning but as i have added about 100 Images I think it looks better this way ( but thats
just me being picky )
)
All the Images you want to use in this program go in the Resources (Images) Section, Just
drag and drop or paste them in.
The Panel that the Images appear in is Panel1, set the BackgroundImageLayout in the Panel1
Properties to ZOOM.
And the Text that you type in the Textbox appears in Label1, which sits on top of the Panel,
Set the Text Alignment to MIDDLE in the Properties and Make the Label1 TRANSPARENT. Also
set the Label1 to AUTOSIZE = FALSE in the Properties.
You add all your Button Image Names in the Combobox collections Tab in the Properties
This is quite time consuming but its worth it in the end. ( just make a list of what you have
called your buttons ie: red round and so on ) I have used .Png Images which i created in
photoshop and they all have transparent backgrounds as I am trying to get it to work so that
they can be saved as .Png with the Transparency so that they then can go on any Webpage
or Color and i dont have to fiddle about making the Backgrounds Transparent again. But at the
moment They dont have transparency so the Background will take the color of your Forms Color.
So if you have your Form back Color as white then it will save the Button with a white background.
I was up allnight last night trying to get it too work with a second Panel and i tried a picturebox and a Label that sat on the back on the form, But alas whatever i tried did not get the effect i am after. One thing i did try which half worked was a Label set to a Second colourdialog which changed the background to any color by using the color swatches, But the Label that recieves the Text was still showing color, Even tho it has a transparent background (Strange :roll: ) When i crack it i will let you all know
The Combobox coding for the Images is this Example and you just repeat it for each Image
The rest of the Code
Chris
Here is a Tutorial for an Updated Version of my Button Express Program. Again this is a Very
Easy Program to make/Code but is very effective never the less.
Just to let you all Know that there are over 100 usable Buttons within this Program
Just like to Give a Big Thanks to CodenStuff for his Help on this Program (Cheers ;) )
Right Lets get Crackin!
On the Form you will need
10 Buttons
8 Comboboxes ( or you can use 1 Combobox)
1 Panel
2 Labels
2 Groupboxes
1 Timer = ENABLE in the Timer Properties
1 ColorDialog
1 FontDialog
1 OpenfileDialog
1 SavefileDialog
As you can see by the 2nd Screenshot Above I have used 8 Comboboxes to link
to my Images ( as i have a few).
But You can put all your Button Pictures Linking to Just 1 Combobox, But it all depends on how
many Images you want to use and how you want it to look, I did have 1 Combobox in the
beginning but as i have added about 100 Images I think it looks better this way ( but thats
just me being picky
All the Images you want to use in this program go in the Resources (Images) Section, Just
drag and drop or paste them in.
The Panel that the Images appear in is Panel1, set the BackgroundImageLayout in the Panel1
Properties to ZOOM.
And the Text that you type in the Textbox appears in Label1, which sits on top of the Panel,
Set the Text Alignment to MIDDLE in the Properties and Make the Label1 TRANSPARENT. Also
set the Label1 to AUTOSIZE = FALSE in the Properties.
You add all your Button Image Names in the Combobox collections Tab in the Properties
This is quite time consuming but its worth it in the end. ( just make a list of what you have
called your buttons ie: red round and so on ) I have used .Png Images which i created in
photoshop and they all have transparent backgrounds as I am trying to get it to work so that
they can be saved as .Png with the Transparency so that they then can go on any Webpage
or Color and i dont have to fiddle about making the Backgrounds Transparent again. But at the
moment They dont have transparency so the Background will take the color of your Forms Color.
So if you have your Form back Color as white then it will save the Button with a white background.
I was up allnight last night trying to get it too work with a second Panel and i tried a picturebox and a Label that sat on the back on the form, But alas whatever i tried did not get the effect i am after. One thing i did try which half worked was a Label set to a Second colourdialog which changed the background to any color by using the color swatches, But the Label that recieves the Text was still showing color, Even tho it has a transparent background (Strange :roll: ) When i crack it i will let you all know
The Combobox coding for the Images is this Example and you just repeat it for each Image
Code: Select all
This little bit of code below goes on the Open Buttons BUTTON
If ComboBox1.SelectedItem = "Name of your Button" Then
            Panel1.Visible = True
            Panel1.BackgroundImage = My.Resources.Your Button Name
End IfCode: Select all
And this little bit of Code below goes on the Close Buttons BUTTON
Me.Height=559Code: Select all
In your Form Properties Section Once you have made this Program SET the Form HEIGHT to 294, If you have done as i have done then the Button Combobox Controls will be Hidden, And when you run and Press the Open Buttons BUTTON the Combobox's will appear as SET by The Open Buttons CODE ( of course you can change the look of this Program to suit your needs )Me.Height=294The rest of the Code
Code: Select all
If you have any problems then please send me a Message and i will talk you through it Private Sub Timer1_Tick(ByVal sender As System.Object, ByVal e As System.EventArgs) Handles Timer1.Tick
Label1.Text = TextBox1.Text
End Sub
Private Sub Button4_Click(ByVal sender As System.Object, ByVal e As System.EventArgs) Handles Button4.Click
FontDialog1.ShowDialog()
Label1.Font = FontDialog1.Font
End Sub
Private Sub Button2_Click(ByVal sender As System.Object, ByVal e As System.EventArgs) Handles Button2.Click
Label1.TextAlign = ContentAlignment.MiddleCenter
End Sub
Private Sub Button5_Click(ByVal sender As System.Object, ByVal e As System.EventArgs) Handles Button5.Click
ColorDialog1.ShowDialog()
Label1.ForeColor = ColorDialog1.Color
End Sub
Private Sub Button1_Click(ByVal sender As System.Object, ByVal e As System.EventArgs)
End Sub
Private Sub Button3_Click(ByVal sender As System.Object, ByVal e As System.EventArgs) Handles Button3.Click
Label1.TextAlign = ContentAlignment.MiddleRight
End Sub
Private Sub Button7_Click(ByVal sender As System.Object, ByVal e As System.EventArgs) Handles Button7.Click
Dim savefiledialog1 As New SaveFileDialog
savefiledialog1.Title = "Save File"
savefiledialog1.FileName = "*.png"
savefiledialog1.Filter = "PNG |*.png"
If savefiledialog1.ShowDialog() = DialogResult.OK Then
Dim bmp As New Drawing.Bitmap(Panel1.Width, Panel1.Height)
Panel1.DrawToBitmap(bmp, New Rectangle(0, 0, bmp.Width, bmp.Height))
bmp.Save(savefiledialog1.FileName, Imaging.ImageFormat.Png)
End If
End Sub
Private Sub Button6_Click(ByVal sender As System.Object, ByVal e As System.EventArgs) Handles Button6.Click
Panel1.BackColor = Color.Transparent
End Sub
Private Sub Button1_Click_1(ByVal sender As System.Object, ByVal e As System.EventArgs) Handles Button1.Click
Label1.TextAlign = ContentAlignment.MiddleLeft
End Sub
Private Sub Button10_Click(ByVal sender As System.Object, ByVal e As System.EventArgs) Handles Button10.Click
Dim openfiledialog1 As New OpenFileDialog
If openfiledialog1.ShowDialog() = Windows.Forms.DialogResult.OK Then
Panel1.BackgroundImage = Image.FromFile(openfiledialog1.FileName)
End If
End Sub
Chris


Quick Profile
Information
Posts: 74
Joined: Fri Sep 18, 2009 3:18 pm View Full Profile
thankssssssss man!!!!!!

Quick Profile
Information
Posts: 69
Joined: Thu Aug 13, 2009 2:35 am View Full Profile
Hungry Hound, when you use the code:
So you don't need to put in the openfiledialog onto the design.
(Same with any dialog you may have)
- Hope this helps you save time in the future :P
Code: Select all
Your basically telling VB that "OFD"( or whatever you might have ) = OpenFileDialog1Dim ofd As New OpenFileDialogSo you don't need to put in the openfiledialog onto the design.
(Same with any dialog you may have)
- Hope this helps you save time in the future :P


Quick Profile
Information
Posts: 49
Joined: Wed Nov 25, 2009 9:25 pm View Full Profile
Can you save ? the button
Quick Profile
Information
Posts: 49
Joined: Wed Nov 25, 2009 9:25 pm View Full Profile
You should add a thing where they can get a picture online
that would make it better
that would make it better
Quick Profile
Information
Posts: 49
Joined: Wed Nov 25, 2009 9:25 pm View Full Profile
Woops I mean a picture of a button not picture
Quick Profile
Information
Posts: 2870
Joined: Mon Jul 27, 2009 11:58 am View Full Profile
Hi
Yes you can save your Button, if you look at the tutorial and the code you will see that is all there. This is just a tutorial to show you how to do things like this, If you want to add extra functions and improve it then thats great news, and please post up a picture of the app when you have reworked it..
Yes you can save your Button, if you look at the tutorial and the code you will see that is all there. This is just a tutorial to show you how to do things like this, If you want to add extra functions and improve it then thats great news, and please post up a picture of the app when you have reworked it..
Quick Profile
Information
Posts: 2821
Joined: Thu Dec 24, 2009 7:52 pm View Full Profile
Hello Everyone!
I have to admit that: T
Button Express thing rocks...
Code'N'Stuff's website rocks...
HungryHounduk really rocks...
Thanks!
I have to admit that: T
Button Express thing rocks...
Code'N'Stuff's website rocks...
HungryHounduk really rocks...
Thanks!

Quick Profile
Information
Posts: 1117
Joined: Mon Sep 07, 2009 8:11 pm View Full Profile
And Nery Rocks too!
Cheers ;)
Cheers ;)
Quick Profile
Information
Posts: 40
Joined: Mon Feb 01, 2010 8:17 pm View Full Profile
bjm0008 wrote:Hungry Hound, when you use the code:Or, you can use the codeCode: Select allYour basically telling VB that "OFD"( or whatever you might have ) = OpenFileDialog1Dim ofd As New OpenFileDialog
So you don't need to put in the openfiledialog onto the design.
(Same with any dialog you may have)
- Hope this helps you save time in the future :P
Code: Select all
This sets OpenFileDialog1 as an object(OpenFileDialog) allowing it to be used in the selector that you can add events and code the events.Public Class Form1
Public WithEvents OpenFileDialog1 As New OpenFileDialog
Private Sub Form1_Load(ByVal sender As System.Object, ByVal e As System.EventArgs) Handles MyBase.Load
'insert code
End Sub
End Class
<?php
$wants_to_make_guide_today = true;
if($wants_to_make_guide_today == true){
make_guide();
}else{
sleep();
}
?>
$wants_to_make_guide_today = true;
if($wants_to_make_guide_today == true){
make_guide();
}else{
sleep();
}
?>
Copyright Information
Copyright © Codenstuff.com 2020 - 2023